Showing posts with label nail art. Show all posts

Friday, June 13, 2014

KBShimmer Spring Pop Art/Comic Nail Art!

Press Sample

Hi guys! Yesterday I posted the creme polishes from the KBShimmer 2014 Spring Collection!
For today's post I used them for a nail art look inspired by Katie Satow's tutorial (see here!)

They came out alright, but I didn't leave quite enough room on my middle and pinky finger.
Oh well.. you live and you learn! I used the following shades for this manicure!

KBShimmer A Touch of Glass, Eclipse, Life Rose On, and Pansy-Monium.
I can't recall the white I used, but it was probably Milani White on the Spot!

KBShimmer  Pop Art (1) KBShimmer  Comic Nail art KBShimmer  Pop Art (2)

I'd like to try this manicure again leaving more space for the zig zags and  with neater lines, I'm a bit rusty though!

I love these colors together so much! What do you guys think? 


Saturday, February 1, 2014

OPI Gwen Stefani Skittle Nail Art


Hi all! Today's post is of a nail art skittle manicure I did using some polishes form the OPI Gwen Stefani collection.
I posted my review & swatches on the blog yesterday, you can check it out here!

You can see a breakdown of what I did to each nail below! Hope you guys like it!

Opi Gwen Stefani Nail Art (1) Opi Gwen Stefani Nail Art (2) Opi Gwen Stefani Nail Art (3)


Pointer

For this nail I started off with 4 In The Morning, then I added on a large diamond stud from the Over & Over A-Gwen set.

I used a little too much glue and the excess is a little noticeable in the pictures but it wasn't in person.

Middle

On this nail I used Love.Angel.Music.Baby. as the base color and using I Sing In Color and Over and Over A-Gwen .

I free-handed the leopard print with a dotting tool.

Ring

For this nail I used a nail art brush and Over and Over A-Gwen & 4 In the Morning to do a sort of color block manicure. Then I added six black crystals from the Over and Over A-Gwen set.  It looks a little funky top putting topcoat over it, so I guess maybe you shouldn't topcoat over studs and gems? I don't really use them enough to know these things! : /


Pinky

The pinky nail has I Sing In Color as the base coat and then I framed it with Love.Angel.Music.Baby.

Then I added a single gold stud again from the Over and Over A-Gwen set!

______________________________________________________

I think the Over & Over A-Gwen boxed set is a really fun starter kit for those you want to try out nail art with gems and studs! It's a nice way to try out different kinds without having to buy a ton of each without knowing if you'll like them or not.
Not to mention the perfect formula of Over & Over A-Gwen! The Over & Over A-Gwen boxed set retails for $14.95.

Be sure to follow OPI on FacebookInstagram, & Twitter!


And a completely random side note - I just finished Dexter yesterday. I don't even know how I feel right now D:
Season 8 seemed all over the place, I still love the show though. I stopped watching it a few seasons ago and caught up when I realized that it's on Netflix. What should I watch now?!?? lol Also I can't believe that it's February!


Tuesday, December 31, 2013

My 13 Favorite Mani's of 2013!


Hi guys! Happy New Years Eve! Sorry I'm so late to getting to my 2013 Favorites posts!
Today's post is my 13 Favorite Manicures from this year!

My Top 13 for Indies and Mainstream polishes will be up soon, so be on the look out!
Those will likely go up after New Years though! :)

There is a link below each photo to see each post and all the products I used!
Here they are in order of most recent to oldest!

13 Fav Mani's of 2013

Friday, December 20, 2013

Reindeer Nail Art!


Hi guys! Today's post is some quick nail art! I've been wanting to redo Reindeer nails for quite a while now.
My original  post here is really old and just not very good haha

I updated it a little... it still didn't come out perfect but definitely an improvement!

Reindeer nail art (1)Reindeer nail art (4) Reindeer nail art (3)

Thursday, December 19, 2013

Plaid Christmas Nail Art!


Hey guys! How are you all doing today? Have you done any Christmas manicures yet?

I tried my hand at some Christmas nail art! I've been wanting to try Plaid nail art for a while now!
I used my three new Elevation Polishes - Limestone, Volcanic Dust & Alpine Heights!
I used Christmas as an excuse to buy them hehe :)

I used the tutorial here from Emily (The Lacquerologist)

First I started off with Limestone as my base color, as seen below!

Elevation Polish Limestone (2) Elevation Polish Limestone (1)

Then I used Volcanic Dust for Steps 2 &3 of Emily's tutorial.
Then Limestone again for Step 4 and 5.
Followed by Alpine Heights and then I used a little but of Zoya Ziv.

See how it turned out below!

Tuesday, December 17, 2013

China Glaze Happy HoliGlaze Holiday Collection 2013 - Swatches & Review


Hi guys! Today I have six polishes from the new China Glaze Happy HoliGlaze Collection to show you! 

Click read more to check them out! I hope you guys enjoy!

China Glaze All Wrapped Up
All Wrapped Up - Three coats.

A full coverage blurple micro glitter polish.

Sunday, September 29, 2013

Breaking Bad Nail Art! Yeah, BITCH!


Hey guys! Any other Breaking Bad fans excited and sad today? I know I am!
Such a weird mixture of emotions lol!

So last night I was procrastinating, I didn't feel like painting my nails or swatching but then I was like..
Why not do Breaking Bad nail art for the finale?! It's been on my nail art to do list anyway!

Man I haven't done nail art in a while, It's crazy how fast I get that "rusty" feeling.
So these are far from perfect but hell it was a last minute decision at like 2 am and I did my best :) Enjoy!!

Breaking Bad Nailart (1) Breaking Bad Nailart (2)


Thumb: The Los Pollos Hermanos Logo, except just the chicken heads
(There is no way I could have for their entire bodies! Heck their heads aren't even recognizable lol!)
Polishes I used:  Zoya Pippa, Jancyn, and Thandie along with Sparitual Clay. I used those for the gradient! I also used Milani White on the Spot. The rest was acrylic paints.

Pointer & Middle: The Breaking Bad show Logo!
Polishes I used: Essie Mojito Madness topped with Elevation Polish Wuyi Mountain as the base color.
Chin Glaze Holly-Day and Milani White on the spot for the logo.

Ring: Heisenberg! (I saw this tutorial here!)
Zoya Phoebe topped with Mosheen as the base. I used black acrylic paint to draw Heisenberg.
I kept screwing up on him so I actually painted him onto a pain stamper and made a decal :)

Pinky: The Golden Moth Chemical Logo that is on their Methylamine Barrels.

I used a combination of Black and yellow acrylic paint with A England Camelot and Zoya Pippa!

______________________________________________________

Who else can't wait for the finale? I can't wait but at the same time I don' want it to end :(
I rewatched the whole show in the past few weeks and I'm even more sad now lol!

I hope you guys enjoyed this post and I hope you all have a A1 day!


Also, 
Please refrain from leaving spoilers below for those who haven't seen the show!


*Some products in this post were sent to me for the purpose of a 100% honest unbiased review.*

Friday, September 20, 2013

Konad Stamping Plate m94 - Review!


Hi guys! Here is post #2 today! Check out #1 HERE :)

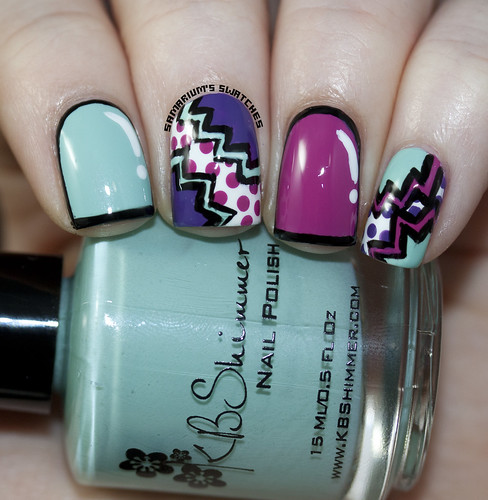
This post is featuring the same polishes in the earlier post, but stamped on with a Konad Stamping plate! Check it out!

Konad m94 Stamping Plate (2)
*Some products in this post were sent to me for the purpose of a 100% honest unbiased review.*Konad m94 Stamping Plate (4)
Konad m94 Stamping Plate (6)
Stamped over Enchanted Polish August 2013 with Konad Special Nail Polish in White.

Konad m94 Stamping Plate (8) Konad m94 Stamping Plate (1)
Stamped over Enchanted Polish Autumn with Konad Special Nail Polish in Black.

Konad m94 Stamping Plate (7)
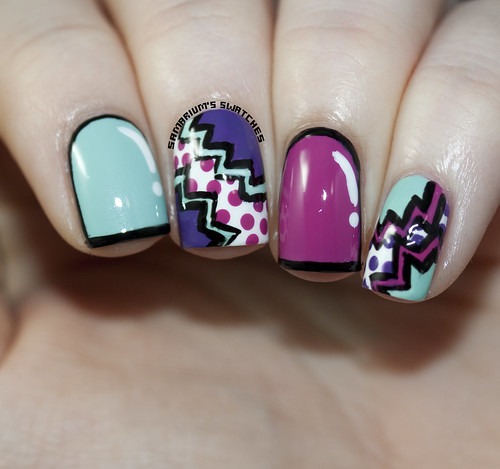
Here is a picture before topcoat, it doesn't look as great on camera but I swear it looked awesome in person!
The black dries matte and Autumn was shiny and holo under it it really "popped" in person!

______________________________________________________

I love stamped nails! I should stamp my nails more! Why don't I?!

Nail Stamping is super fun and a relatively easy way to do fun nail art!

Once you get it down pat it only takes a few extra minutes and adds so much!

I have tried many stamping plates (Bundle Monster, Cheeky, Fab Ur Nails & more!)
Konad are some of the best and easiest to use. They are also more expensive than other brands though.
I only have a handful of Konad plates but the ones I do have stamp perfectly.
I think they are easier to use than some other cheaper competitors. They are perfect for beginners!


Here are a few tips for newbies!

Can't get the design to pick up from the plate?

Lightly Buff your stamper with a nail file or buffing block!
Don't use a grit too low or too high. (I prefer 220-300, 180 is too rough and 400 is too gentle.)

Having trouble getting the design to stamp onto you nail completely?

Sometimes I like to add a coat of a Strong Adhesion base coat on top (yes on top!) of my base polish before stamping! I find that it helps stick the design on. I use China Glaze's Strong Adhesion base coat.

Is the clean up a hassle?


Tape around your fingers before stamping!
Especially if you are using Konad Special Nail Polish in Black, the clean up is a gazillion times easier!
When the black gets wet from the brush during cleanup it seeps into every nook and cranny around your nail and cuticle and is practically impossible to remove.


If you are a newbie I highly recommend using Konad special polishes, I use them even though I've been stamping for a while. Sure I use other brands sometimes but the Konad ones work the best for me absolutely hands down.
The black one is a pain to clean up, but it just goes on so damn crisp!

And for the love of all that is holy don't use the metal scraper than comes with stamping plates!
Use a plastic card from a store card (CVS, Kroger, etc) or a old credit card, they make it exponentially easier!


You can purchase this Konad stamping plate, along with others for $8.75 from Nail Polish Canada
They also sell Konad special stamping polishes!

Follow Nail Polish Canada on Facebook and Twitter to stay updated on new products and deals!

Enchanted Autumn Collage

Have you ever used tried stamping your nails?
If so, What is your favorite brand of stamping plates?

*Some products in this post were sent to me for the purpose of a 100% honest unbiased review.*

Wednesday, September 18, 2013

A Waterfall Mani, Watercolor Spots & More!


Hey guys! here is a quickie for you :)
Here are three recent-ish nail art mani's I did that I wasn't really thrilled with so I didn't post them.
But I feel bad i haven't posted much and they were just sitting there, so here you go!

I'm sorry that I do not remember all the polishes I used in these, it has been weeks -_- My bad!
I named the ones I could!


I hope you are all having a terrific week!
Pretty good here! We found a house we like finally! We have been house hunting off and on for six months, but we found a house we love and put in a offer, got a counter off and accepted it.
The house gets inspection on Friday and if all goes well it looks like we have a new house! YAY!

Here was my first attempt on the Waterfall mani technique that Sammy from The Nailasaurus came up with!

Waterfall Mani

Polishes used That I can remember:
Zoya - Farah

Illamasqua - Rare
Illamasqua - Gamma
Illamasqua - Nomad
Nails Inc - Baker Street
Finger Paints - Pink Perspective


This one is uhh.. Watercolor Spots? Blobs? Who knows.
Watercolor Spots

Polishes used That I can remember:

 China Glaze - Sweet Hook...I think
China Glaze - Sunday Funday
China Glaze - Urban Night
The Pink.. I have no idea.
Zoya - Breezi?
Illamasqua - Poke


I'm just going to call this one Splotchy Blobs, yes..Colorful Splotchy Blobs...
Splotchy Colorful Blobs


Polishes used That I can remember:

Illamasqua - Rare
Illamasqua - Nurture
Illamasqua - Poke
Illamasqua - Gamma
Finger Paints - Pink Perspective
China Glaze - Turned Up Turquoise


*Some products in this post were sent to me for the purpose of a 100% honest unbiased review.*

Tuesday, August 20, 2013

Guest Post on Kellie Gonzo!

Hey guys! Today yours truly has a guest post on http://www.kelliegonzo.com/!

So head on over to her amazing blog to see what I used HERE!

Neon Watermarble (1)

Let me know what you think of it!!


Monday, July 29, 2013

piCture pOlish Blogfest 2013!

Hey guys! It's that time of year again - piCture pOlish Blogfest!!
This year everybody will be doing nail art with the shades provided,
I can't wait to see what everyone comes up with!!

piCture pOlish Blogfest 2013 Nail Art (1)

Here is the nail art look I came up with! But before I get into how I made this look,
and my very first video tutorial attempt These are the three shades I used!

piCture pOlish Heavy Metal
Heavy Metal  - Two coats.
piCture pOlish Honey Dew
Honey Dew - Three thin coats.
piCture pOlish Hot Lips
Hot Lips - Three very thin coats over White.
_______________________________________________________

Here is my tutorial, my very first one so yeah it's super far from perfect!
There is also a pictorial thing below int his post!


IMG_2086
Here is everything I used!

piCture pOlish Blogfest2013 Tutorial


  • Step 1 -
    Start with nail strengthener and base coat. I used Nailtek II and Orly Bonder.
    Then apply your base colors. I used Honey Dew on my ring & thumb nails.
    I applied a white base to my pointer, Hot Lips on my middle nail, and Heavy Metal on my pinky nail.
  • Step 2 -  
    Frame your pinky nail using Hot Lips and a small nail art brush.
    Draw a X shape on your ring nail using Hot Lips, then fill in the sides.
    Draw a triangle on your middle nail using Honey Dew.
  • Step 3 -
    Reapply Hot Lips to your "framed" pinky nail and the sides of the X on your ring nail for opacity.
    Using a small nail art brush and Heavy Metal, fill in the triangle areas on your middle & ring nails.
  • Step 4 - 
    Apply Honey Dew and Hot Lips to a wedge makeup sponge and apply to your white pointer nail.
    Repeat this process 3-5 times until your desired look is acquired!
  • Step 5 -
    Using top coat and a wax pencil (or whatever you use to pick up studs and rhinestones)
    pick up the studs one at a time and apply to your pinky and ring finger nails.
    I used a 2mm circle neon pink stud on my pinky nail and a 2mm black square stud on my ring nail.
  • Step 6 - 
    Use a small clean portion of the same wedge sponge you used above and dab Heavy Metal
    onto your thumb nail. Once dry apply topcoat to all of your nails and you are good to go!

piCture pOlish Blogfest 2013 Nail Art (2) piCture pOlish Blogfest 2013 Nail Art (3) piCture pOlish Blogfest 2013 Nail Art (6)


Make sure to follow piCture pOlish!
See other Bloggers Blogfest mani's on the Pinterest board here!

You can follow piCture pOlish via Facebook, Twitter, Pinterest, YouTube & Instagram!

To learn more about piCture pOlishes Shipping Policies, Network, and Deals check out https://www.picturepolish.com.au


*Products in this post were sent to me from piCture pOlish.*

Tuesday, July 16, 2013

Comic Con Geek Week Nail Art - Portal Nail Art

Okay so were supposed to be on Day 2 I did these super late last night and couldn't post on time :(
I will try to catch up but I'm not sure I will have time to even finish this challenge since my nephews will be here soon and I'm going to be watching them while my sister is at Comic Con, but I will try!
Gives me a chance to do nail art that I already plan to do anyway!


For day one I decided to do a game mani, since I don't read very often anymore.
It was hard to decide between WoW, Bioshock and Portal! I chose Portal, seemed easiest and I was tired!

Portal Nails Portal Nail Art

So I didn't do the greatest job, I was sleepy.
The pink used was China Glaze Dance Baby and the grey is Zoya Kelly. The rest is acrylic paint.

My mani includes the Portal logo, a test subject jumping through a portal, Companion Cube, a turret and the cake is a lie (yeah the cake doesn't look great lol)

Now I need to decide which TV show to do nail art for and hope I can get to that asap! :)


Friday, June 28, 2013

Happy Birthday Felicia! Felicia Day Nail Art!

Hey guys! today's post is to commemorate Felicia Day!
I'm not sure how many of you know this (or how many of you know who she is)
But I'm a super big fan fan girl of Felicia! 
She is super awesome and I love everything she does, and completely respect her to the fullest!
It's her birthday and I've been wanting to do nail art about her for almost a year,
I planned to for Dragoncon but didn't get to go :(


Here's a rundown of what is on each nail.


  • Pointer - The Flog Logo, though she isn't currently making them anymore I highly recommend you to go watch them! I miss her Fave Fives!
  • Middle - This one is my favorite! It's Codex's gear/costume from The Guild!
  • Ring - The Geek & Sundry Logo, here is the Youtube channel. It's amazing, just watch everything she does.
  • Pinky - I wanted to do a nail for The Guild but I couldn't fit it all and decided to do the G!

Felicia Day Nail Art (2) Felicia Day Nail Art (3) Felicia Day Mani (5) Felicia Day Nail Art (1) Felicia Day Mani (2) Felicia Day Mani (1) Felicia Day Mani (6)
Here is everything (besides my brushes/dotting tools) that I used!

Kbshimmer Clearly On Top, A England Holy Grail, Zoya - Ziv, Jaqueline, Chyna, & Purity, China Glaze Adventure Red-y, and Illamasqua Nuture. Along with various Acrylic paints!


My mani isn't near perfect but I'm really happy with it!
Anybody else HUGE FD fans? 


*Some products in this post were sent to me for review.*