Showing posts with label nail stamping. Show all posts

Monday, July 21, 2014

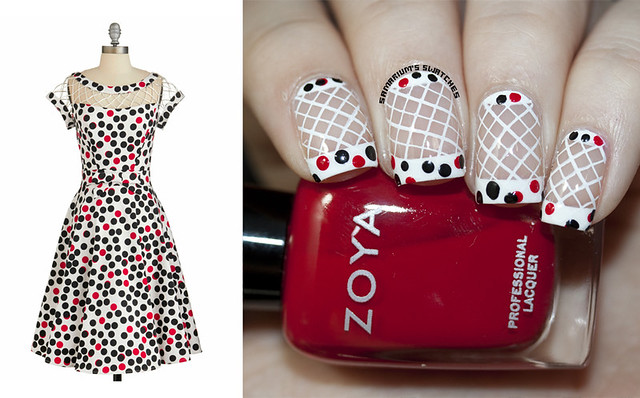
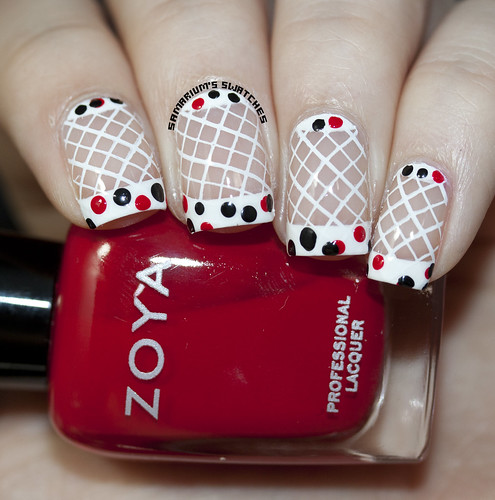
Polka Dot Fishnet Nail Art - Inspired by ModCloth!


Hi guys! It's been a long time.. I know! Sorry about that. (I've missed you!)

I was recently contacted by ModCloth about doing a nail art look inspired by their dresses and it gave me the push of motivation and inspiration to post! I completely adore their products so I was really excited to have been contacted!

Then while browsing I came across the With Only a Wink Dresses and it reminded me of my Fishnet French Mani.
Then I saw the polka dot version and I knew I had to try it! I've been itching to do another version for quite a while anyway.

I started off this mani with Rica Whiteout, and using a nail art brush I freehanded on the french tips and half moons.
I used Whiteout to stamp the fishnet pattern with MoYou's  XL Pro Collection Plate 01.
And the Polka Dots were done with a dotting tool, Rica Black out, and Zoya Sooki.
ModCloth Nail Klub

Modcloth Nail Art With Only a Wink Dress in Dots
I hope you guys liked this manicure! Is anybody else obsessed with ModCloth?
I love practically everything they have, if only I had more money! And I really love and appreciate that they offer Plus Size clothing. It can be damn hard to find cute fashionable clothes that fit me sometimes!
I hope that you are all well and having a wonderful summer! <3


Friday, January 31, 2014

OPI Gwen Stefani Collection - Swatches & Review!


Hey guys! Who else is excited that it is Friday? Anybody have any fun plans today or this weekend?
Not a lot going on here (what else is new!) Today I'm going to head to Sephora to get my birthday gift
 before the month is over! Yeah, I'm a procrastinator! Probably going to get groceries too... fun times!

Well today's post is featuring the new Limited Edition Gwen Stefani Collection from OPI!
I'm so excited about this collection, I love the colors and Gwen Stefani!
I don't know much of her new music but I still listen to No Doubt all the time!


Tuesday, December 31, 2013

My 13 Favorite Mani's of 2013!


Hi guys! Happy New Years Eve! Sorry I'm so late to getting to my 2013 Favorites posts!
Today's post is my 13 Favorite Manicures from this year!

My Top 13 for Indies and Mainstream polishes will be up soon, so be on the look out!
Those will likely go up after New Years though! :)

There is a link below each photo to see each post and all the products I used!
Here they are in order of most recent to oldest!

13 Fav Mani's of 2013

Monday, December 30, 2013

Sinful Stamping with Fab Ur Nails

Hi guys! Happy Monday! I hope you all had a wonderful weekend!
Anyone have any fun plans for New Years Eve? Were going to head back to my sisters for her NYE party!
I've never been to one before, can you believe that? lol I'm so boring.

I'm still trying to think of ideas for a Birthday Mani but I have no creativity atm!
Anything you guys would like to see? I really miss doing more nail art, that's another thing I need to work on in 2014.

Today's post is some quick stamping I did a while ago that I really loved. I just love the design!
It looks like the rug Kelly from Vampy Varnish bought and posted on Instagram haha
I remember because I totally want to buy it too!

Check out what I used for this mani after the jump!

Sinful Colors Leather Loose Stamping with FAB UR NAILS Fun 7 (1)

Thursday, December 12, 2013

Rescue Beauty Lounge Insouciant & Wintry Snowflake Nail Stamping!


Hey guys! Today's post is a really cute snowflake stamping manicure I did the other day!
I really loved it and I hope you guys do too!

Rescue Beauty Lounge Insouciant
First I started off with two coats of Rescue Beauty Lounge Insouciant!
This is one of the four RBL's I bought during the sale last month! My very first RBL's!

Wintry Snowflakes (2)
I added two snowflake stamping images from the following Bundle Monster plates:
BM-323 & BM-H02 using Konad white stamping polish.

Wintry Snowflakes (3)

Then I added one coat of the Glitter Gal Galaxy Holo Topcoat! (I reviewed it yesterday here!)

I loved this mani so much that I wore it for almost four days (which for me is a long time!)
I didn't want to take it off! It was even prettier/cuter in person :D

What do you think about this manicure? I've been in a winter-y mood and a stamping mood lately!
 I really just adore this! Id there any Christmasy or Winter inspired manicures you would like to see?
I've been itching to do more nail art since I haven't in what seems like forever.
I would love to hear recommendations if you have any! 

I hope everybody is having a great day and week so far!


Monday, December 9, 2013

Holiday Nail Stamping! Ornaments & Ribbons!


Hey guys! Who else is super excited for Christmas!? I can't wait!
Me and my husband don't really celebrate it for ourselves but we do for our daughter,
and there is nothing more fun than watching her on Christmas morning!

It's funny how different it is as an adult, and as a parent!
Fun in such a different way :) I have everything all wrapped and ready!

So I was feeling the holiday spirit and decided to do this stamping recently!
I wanted to post it in my sooner but I couldn't find one of the stamping plates I used.. Oops!
But I have since found it, so here it is!

Stamping

Wednesday, November 13, 2013

MoYou Stamping Plate - Sailor Collection 05


Hi again guys! Here is a quick post of some stamping I did with one of my new MoYou London stamping plates!
I stamped over the Femme Fatale Twilight Meteroite layering combo from the review I posted earlier today.

I used Konad Stamping Polish in White and the MoYou Sailor Collection 05 stamping plate.

MoYou Stamping Plate Sailor Collection 05  (2)

Wednesday, October 30, 2013

A Fun Fishnet French Manicure!


Hey guys! Guess what today is? Closing day!!! Today we will be homeowners! O:

Today's post is a copy cat manicure that I saw Lauryn of Polish Revolution post on her Instagram!
See her Butter London inspired manicure without the stamping here, and with it here!

I like Lauryn's better but scroll down to see mine below!

Black French Manicure Fishnet French Manicure  (1) Fishnet French Manicure  (2)

I started with nail strengthener, then used a small striping brush & A England Camelot for the French Tips and Half Moons.
For the stamping I used MoYou London Pro Collection 02 XL plate and Konad stamping polish in black.

What do you guys think of this mani? It smudged a tiny bit and it's not quite perfect.
 I don't really ever do French Tips or Half Moons so I need to more to get the practice!

Also Is there a name for a French Manicure with Half Moons?
I haven't found one so if there isn't I think we should name it!


Friday, September 20, 2013

Konad Stamping Plate m94 - Review!


Hi guys! Here is post #2 today! Check out #1 HERE :)

This post is featuring the same polishes in the earlier post, but stamped on with a Konad Stamping plate! Check it out!

Konad m94 Stamping Plate (2)
*Some products in this post were sent to me for the purpose of a 100% honest unbiased review.*Konad m94 Stamping Plate (4)
Konad m94 Stamping Plate (6)
Stamped over Enchanted Polish August 2013 with Konad Special Nail Polish in White.

Konad m94 Stamping Plate (8) Konad m94 Stamping Plate (1)
Stamped over Enchanted Polish Autumn with Konad Special Nail Polish in Black.

Konad m94 Stamping Plate (7)
Here is a picture before topcoat, it doesn't look as great on camera but I swear it looked awesome in person!
The black dries matte and Autumn was shiny and holo under it it really "popped" in person!

______________________________________________________

I love stamped nails! I should stamp my nails more! Why don't I?!

Nail Stamping is super fun and a relatively easy way to do fun nail art!

Once you get it down pat it only takes a few extra minutes and adds so much!

I have tried many stamping plates (Bundle Monster, Cheeky, Fab Ur Nails & more!)
Konad are some of the best and easiest to use. They are also more expensive than other brands though.
I only have a handful of Konad plates but the ones I do have stamp perfectly.
I think they are easier to use than some other cheaper competitors. They are perfect for beginners!


Here are a few tips for newbies!

Can't get the design to pick up from the plate?

Lightly Buff your stamper with a nail file or buffing block!
Don't use a grit too low or too high. (I prefer 220-300, 180 is too rough and 400 is too gentle.)

Having trouble getting the design to stamp onto you nail completely?

Sometimes I like to add a coat of a Strong Adhesion base coat on top (yes on top!) of my base polish before stamping! I find that it helps stick the design on. I use China Glaze's Strong Adhesion base coat.

Is the clean up a hassle?


Tape around your fingers before stamping!
Especially if you are using Konad Special Nail Polish in Black, the clean up is a gazillion times easier!
When the black gets wet from the brush during cleanup it seeps into every nook and cranny around your nail and cuticle and is practically impossible to remove.


If you are a newbie I highly recommend using Konad special polishes, I use them even though I've been stamping for a while. Sure I use other brands sometimes but the Konad ones work the best for me absolutely hands down.
The black one is a pain to clean up, but it just goes on so damn crisp!

And for the love of all that is holy don't use the metal scraper than comes with stamping plates!
Use a plastic card from a store card (CVS, Kroger, etc) or a old credit card, they make it exponentially easier!


You can purchase this Konad stamping plate, along with others for $8.75 from Nail Polish Canada
They also sell Konad special stamping polishes!

Follow Nail Polish Canada on Facebook and Twitter to stay updated on new products and deals!

Enchanted Autumn Collage

Have you ever used tried stamping your nails?
If so, What is your favorite brand of stamping plates?

*Some products in this post were sent to me for the purpose of a 100% honest unbiased review.*

Sunday, July 7, 2013

Inglot O2M Breathable Nail Enamel 673, 687 & 688 - Swatches & Review

Hey guys! Today's post is a quick review of three gorgeous Inglot O2M polishes!
Two of them are new summer shades!

Let me preface this post saying I had a pretty hard time capturing 688 and tried my best to color correct my swatch or 688 and the gradient with 687/688. I think I did okay, but it's not something I try to do often.

I usually get a color accurate picture with different camera settings but I shot it every which way and it was just slightly off and still is a bit. I think the best picture of it is int he stamped gradient, there way so much going on but somehow I feel that is the best representation of it I ended up getting! 

So anyway that is why my skin is  a little odd colored in a few of the photos!


*Products in this post were sent to me for the purpose of a 100% honest unbiased review.*Inglot O2M Breathable Nail Enamel 673 687 688 (2)Inglot 673
673 - Three thin coats.

Inglot 687
687 - I used three thin coats. Two for opacity.
Inglot 688
688 - Two thin coats.
_______________________________________________________

I really like these polishes! This is my first time trying anything from Inglot
(I've been lemming their eye shadows and liners for ages though!) 
I'm pleased with the formula and the colors. They applied a little bit streaky at first, 
but 687 and 688 smoothed out well on the second coat and 673 did on the third.
I love all three shades so much, I can't wait to try more! 
I think that 673 is the closest "Mannequin Hands" polish I've come across for me so far!
Also double up on base coat for 688! It stained my nails, nothing another coat of base coat can't prevent though.

Here's some information about the O2M formula!
"The O2M’s unique formulation is revolutionizing nail beauty through its breathable formula.
 The breathable nail enamel allows oxygen and water to pass through the enamel to the nails surface.
 The oxygenation ensures better health care for nails whilst enhancing their beauty. 
O2M Nail Enamels do not include toluene, formaldehyde, DBP, or camphor.
Use with INGLOT’s O2M Breathable Base and O2M Breathable Top Coat."

You can purchase Inglot O2M Breathable Nail Enamel online at INGLOTUSA.com, from INGLOT Boutique Locations in NYC, Las Vegas, Miami, Newport Beach, New Jersey and select Macy’s Department Stores. For additional information and store locations, visit inglotcosmetics.com
They retail for $14.00 each and are 11 ML/0.37 US FL OZ.

Be sure to go follow Inglot on Facebook, Instagram and Twitter!

Scroll down for some nail art I did with these!
Inglot Stamping
Gradient with 673, 687 and 688 stamped with Konad Special White and Stamping plate BM - 306.
Yep, the index finger is messed up haha, but lets just pretend that one is perfect like the others mmkay?

Inglot Stamping Matte

Topped with a coat of Butter London Matte Finish.
Inglot 687 and 688 Gradient (1)
I used 687 and 688 in a gradient, simple & subtle but gorgeous! The are flawless together. 
Inglot 687 and 688 Gradient (2)
Topped with Northern Lights.


Have you guys ever tried Inglot nail polishes? 
What do you think of these?


OH! And my giveaway ends in 6 hours!! GO ENTER Here!
*Products in this post were sent to me for the purpose of a 100% honest unbiased review.*

Friday, June 21, 2013

Elevation Polish Huangshan, Uluru, and Tette + Nail Stamping!

Hey guys! Today;s post is showcasing a few of my first Elevation Polishes!
I picked up four recently (Toubkal is the other, haven't worn it yet) And then the amazing Ida sent me three!!
So I also have Cascade, Haba Xueshan and The Wit! You will see all of those soon too!

I'm really loving all of my new Elevation Polishes so much!
I think deep down I just..knew that I would and that's why I put off trying them for so long, to keep my wallet safe :)

IMG_0209 Elevation Polish Huangshan
Huangshan - One coat over Kbshimmer 24 Carrot Bold.

Holy shiznit guys!! My camera was not happy with me with this mani LOL
SOO pretty & bright! A truly epic combo!

Elevation Polish Tette
Tette 

This polish is very thin, seriously I think this was 5 thin coats.
But the coats did dry very quickly and it didn't build up a lot, it felt more like 3 coats of a normal polish "thickness wise" if you know what I mean!

Elevation Polish Uluru
Uluru

I can't remember but I think I used two coats.. at two there is a very slight VNL but not enough to bother me.

8615a096d9d811e2979b22000a9f4ded_7
For you guys who saw this sneak peek on IG yesterday.. it's stamped over Uluru!!

Elevation Polish Uluru Stamped (3) Elevation Polish Uluru Stamped (2)
I decided to stamp over Uluru with Konad Special black polish and stamping plates DRK-A & BM-323.


Mommy and Me Manis Elevation Uluru (2) Mommy and Me Manis Elevation Uluru (1)
Sky really loved Uluru and wanted it on too so I painted her nails too :)
She kept moving so I couldn't get a great picture of ours together but, you get the idea.


*Some products in this post were sent to me for review.*

Wednesday, June 19, 2013

Kbshimmer Summer Collection - Swatches & Review

Hi guys! Is it just me or is this week just dragging by?
Oh well, Anywho.. Today's post I have four pretties from the new Kbshimmer Summer Collection to show ya!


*Products in this post were sent to me for the purpose of a 100% honest unbiased review.*
Kbshimmer Summer Collection Kbshimmer Summer Macros
Kbshimmer 24 Carrot Bold (1) Kbshimmer 24 Carrot Bold (2)
24 Carrot Bold - Three coats.

"24 Carrot Bold is a red-orange polish that is a stunning summer color.  
This orange polish has a gold micro flake that shines in the light."

Kbshimmer 24 Carrot Bold
24 Carrot Bold with one coat of Kbshimmer's Clearly On Top.

Kbshimmer Blinded By the Bright
Blinded By the Bright - Three coats.

"Break out the sunglasses, Blinded By The Bright is a shocking neon yellow polish make for the summer.  No need to put on any white undies, this polish stands on its own.  
A rainbows worth of hex shaped glitter completes this neon polish."

Kbshimmer Pimp My Pride
Pimp My Pride - Three coats.

This white based polish features metallic red and blue glitters in both hex and micro slice shapes.  
Best worn in three coats, or 1-2 coats over your favorite white. Sure to be a hit at your next summer outing.

Kbshimmer The Dancing Green
The Dancing Green - Three coats.

The Dancing Green is a bright green polish with a blue undertone.  
This polish features fuchsia square glitters, chartreuse dots, sapphire hex glitters and fuchsia dots.  

Kbshimmer The Dancing Green Stamped
The Dancing Green Stamped over with DRK-A and Konad Black Pearl.
I'm out of practice so it didn't stamp great, but the glitter distracts from it so, yay!
_______________________________________________________


OMGorgeousness. I love all of these so much. 
24 Carrot Bold is already one of my favorite oranges, I have worn it three time already, just sooo pretty!
The Dancing Green is another huge favorite for me, but seriously they are all perfect!
I had absolutely zero application problems with any of these, they went on very smoothly.
24 Carrot Bold dries to a Satin/Matte finish so  I was surprised that it applied so easy breezy.
And even though The Dancing Green has kinda large square glitter they all went on smoothly and laid flat.

I highly recommend this collection and I definitely plan on getting some of the others too,
Totally Tubular & Whats Your Damage are calling my name!


Kbshimmer is available for purchase through their Website and Etsy

The polishes retail for $8.75 each, You have the option to buy the 9 Piece Summer Collection for $78.75
  It's the same price but saves you the trouble of buying them separately, plus you get a free topcoat! :)


Stay updated with Christy and her amazing polishes on Facebook, Twitter, and Instagram!

Kbshimmer Summer Collage

Have you guys picked up any of these or do you plan to?
*Products in this post were sent to me for the purpose of a 100% honest unbiased review.*