Showing posts with label bundle monster. Show all posts

Thursday, December 12, 2013

Rescue Beauty Lounge Insouciant & Wintry Snowflake Nail Stamping!


Hey guys! Today's post is a really cute snowflake stamping manicure I did the other day!
I really loved it and I hope you guys do too!

Rescue Beauty Lounge Insouciant
First I started off with two coats of Rescue Beauty Lounge Insouciant!
This is one of the four RBL's I bought during the sale last month! My very first RBL's!

Wintry Snowflakes (2)
I added two snowflake stamping images from the following Bundle Monster plates:
BM-323 & BM-H02 using Konad white stamping polish.

Wintry Snowflakes (3)

Then I added one coat of the Glitter Gal Galaxy Holo Topcoat! (I reviewed it yesterday here!)

I loved this mani so much that I wore it for almost four days (which for me is a long time!)
I didn't want to take it off! It was even prettier/cuter in person :D

What do you think about this manicure? I've been in a winter-y mood and a stamping mood lately!
 I really just adore this! Id there any Christmasy or Winter inspired manicures you would like to see?
I've been itching to do more nail art since I haven't in what seems like forever.
I would love to hear recommendations if you have any! 

I hope everybody is having a great day and week so far!


Monday, December 9, 2013

Holiday Nail Stamping! Ornaments & Ribbons!


Hey guys! Who else is super excited for Christmas!? I can't wait!
Me and my husband don't really celebrate it for ourselves but we do for our daughter,
and there is nothing more fun than watching her on Christmas morning!

It's funny how different it is as an adult, and as a parent!
Fun in such a different way :) I have everything all wrapped and ready!

So I was feeling the holiday spirit and decided to do this stamping recently!
I wanted to post it in my sooner but I couldn't find one of the stamping plates I used.. Oops!
But I have since found it, so here it is!

Stamping

Sunday, July 7, 2013

Inglot O2M Breathable Nail Enamel 673, 687 & 688 - Swatches & Review

Hey guys! Today's post is a quick review of three gorgeous Inglot O2M polishes!
Two of them are new summer shades!

Let me preface this post saying I had a pretty hard time capturing 688 and tried my best to color correct my swatch or 688 and the gradient with 687/688. I think I did okay, but it's not something I try to do often.

I usually get a color accurate picture with different camera settings but I shot it every which way and it was just slightly off and still is a bit. I think the best picture of it is int he stamped gradient, there way so much going on but somehow I feel that is the best representation of it I ended up getting! 

So anyway that is why my skin is  a little odd colored in a few of the photos!


*Products in this post were sent to me for the purpose of a 100% honest unbiased review.*Inglot O2M Breathable Nail Enamel 673 687 688 (2)Inglot 673
673 - Three thin coats.

Inglot 687
687 - I used three thin coats. Two for opacity.
Inglot 688
688 - Two thin coats.
_______________________________________________________

I really like these polishes! This is my first time trying anything from Inglot
(I've been lemming their eye shadows and liners for ages though!) 
I'm pleased with the formula and the colors. They applied a little bit streaky at first, 
but 687 and 688 smoothed out well on the second coat and 673 did on the third.
I love all three shades so much, I can't wait to try more! 
I think that 673 is the closest "Mannequin Hands" polish I've come across for me so far!
Also double up on base coat for 688! It stained my nails, nothing another coat of base coat can't prevent though.

Here's some information about the O2M formula!
"The O2M’s unique formulation is revolutionizing nail beauty through its breathable formula.
 The breathable nail enamel allows oxygen and water to pass through the enamel to the nails surface.
 The oxygenation ensures better health care for nails whilst enhancing their beauty. 
O2M Nail Enamels do not include toluene, formaldehyde, DBP, or camphor.
Use with INGLOT’s O2M Breathable Base and O2M Breathable Top Coat."

You can purchase Inglot O2M Breathable Nail Enamel online at INGLOTUSA.com, from INGLOT Boutique Locations in NYC, Las Vegas, Miami, Newport Beach, New Jersey and select Macy’s Department Stores. For additional information and store locations, visit inglotcosmetics.com
They retail for $14.00 each and are 11 ML/0.37 US FL OZ.

Be sure to go follow Inglot on Facebook, Instagram and Twitter!

Scroll down for some nail art I did with these!
Inglot Stamping
Gradient with 673, 687 and 688 stamped with Konad Special White and Stamping plate BM - 306.
Yep, the index finger is messed up haha, but lets just pretend that one is perfect like the others mmkay?

Inglot Stamping Matte

Topped with a coat of Butter London Matte Finish.
Inglot 687 and 688 Gradient (1)
I used 687 and 688 in a gradient, simple & subtle but gorgeous! The are flawless together. 
Inglot 687 and 688 Gradient (2)
Topped with Northern Lights.


Have you guys ever tried Inglot nail polishes? 
What do you think of these?


OH! And my giveaway ends in 6 hours!! GO ENTER Here!
*Products in this post were sent to me for the purpose of a 100% honest unbiased review.*

Thursday, October 18, 2012

Belated 10/16-Halloween Nail Art Challenge- Freestyle

 Hey guys! I know that this is late-and to be completely honest today's will be also.
 (Seeing as I haven't done it yet!)  >.< I keep losing track of this challenge.

Sorry for the bad clean up, and the bad writing I feel super jumbled up currently O_o
IMG_2069
Pointer:
I was going for a Mummy. lol
I used Illamasqua-Scorn, Milani-White on the Spot and Serum No. 5 Dayglow for the eyes,

Middle:
A Failed attempt at a Ruffle Mani-been wanting to try this forever! I wish I could do them as good as Sarah! This was my official first attempt at one. I accidentally smudged it and had to redo a bit at the bottom.. and then it smeared when I used TC : /
The polishes I used for this are Zoya-Mira, Opi-A Roll in the Hague, Orly-Fresh, Zoya-Pinta, Illamasqua-Rare, Illamasqua-GammaIllamasqua-Scorn and Illamasqua-Poke.

Ring:
I started with SpaRitual-Blue moon on a little over half my nail, and the other half I used China Glaze-West Side Warrior. Using white I painted the mood and Tombstone on my nail. I west over the stone with Zoya-Dove. Using a medium striper I used Zoya-Shawn and Zoya-Dree to make the "Grass" look less boring. Stamped on black bats with BM-213, and added the RIP and black along the edge of the tombstone.

Pinky:
I couldn't decide what to do here. I used Serum No. 5- Dayglow over white, and then put Opi-Spotted on top to test it out.


Monday, October 1, 2012

Halloween Nail Art Challenge - Trick or Treats 10/1

Hey guys!! Wow October already?! Craziness. 
Today's part of the challenge is Trick or Treats! So here are my treat covered nails :) Enjoy! Halloween Nail Art Trick or Treats (1) Halloween Nail Art Trick or Treats (7) Halloween Nail Art Trick or Treats (8) Halloween Nail Art Trick or Treats (2) Halloween Nail Art Trick or Treats (11) Halloween Nail Art Trick or Treats (16)

Okay I used a lot of polish! When don't I? I think that's how I justify the amount of polish I own.
"Just use as many as possible during nail art!" haha.

Can you tell that my ring finger is supposed to be a gummy bear? Oh..Well, it is.
Kind of a funny looking little guy. hehe
And my middle finger a cupcake with a skull on top, which I'm not sure is obvious or not.

  • Pointer & Pinky: I used Bundle Monster plate BM-306. Milani-Yellow Whiz; Fast Fuchsia, Opi-A Roll in          the Hague, Illamasqua-Poke & Smash, Zoya-Robyn & China Glaze-Aquadelic.
  • Middle: Illamasqua-Poke & Smash, Opi-A Roll in the Hague, Cult Nails-Deal with It, Wet n Wild-Black Creme, Nail-Venturous-Humblebee & Trelly's Misc Polish-Sunset Boat Ride.
  • Ring: China Glaze-Poinsettia, Zoya-Kate & Harley, and Lush Lacquer-Shred Me Silly.

I started with a coat of Nailtiques Formula 2, and three coats of Zoya-Harley.
For the stamping, I just placed multiple dots of polish on the plate before I scraped it.
For my cupcake nail I applied a coat of Smash on the bottom 1/2 of my nail, then repeated with Deal with it.  I did the stripes with a striping brush and A Roll in the Hague, the icing with Poke the biggest dotting tool I have.
I dabbed some of Humblebee & Sunset Boat Ride onto Poke with the polish brushes for sprinkles.
The "skull" was done with a dotting tool. Finished with two coats of SV.  /whew! :D
_____________________________________________________________________________
Here is the line up, if you want to join in or just see what to expect!

This is the first nail challenge I have taken part in, I love that it isn't a everyday thing.
I knew I couldn't keep up with one of those. But I am really going to try and stick to this one :)

Which are you the most excited to see?

Happy October!! <3
-Sarah

P.S. - Don't forget to check out the other ladies who are participating below!!!

Wednesday, July 4, 2012

Happy 4th of July! Patriotic Mani

Hey guys! Happy Fourth of July!
Not super happy with how my mani turned out, kinda messy D:

Shout out to my girl Karin from http://www.rinsnailfiles.com/!
Happy birthday sweetie!! <3 <3


Not sure why they look grungy probably from lotion, oops :P
Plus I didn't clean it up too nicely (Ambien kicked in last night lols!)

Index: I started with two coats of Zoya-Purity, then taped my nail with scotch tape to make the square with Essence-Just Rock It . I made the stripes with the red Sinful Colors striper. Dotting tool for the dots/"stars".
Middle: Base coat is one coat of Zoya-Sooki, used scotch tape to make "Fireworks" (failed haha) I used Zoya-Trixie, and then Essence-Just Rock it again.
Ring: Zoya-Purity, Zoya-Trixie, Essence-Just Rock It & Milani-Sail Away. I used a black striper to outline it.
I added some glitter from the cupcake from Milani- Red (584) and Lynnderella-Bibbity Boppity Boo Blue.
Pinky: Base Zoya-Purity, Zoya-Sooki and Sally Hansen-Co-Bolt Blue stamped with Bundle Monster Plate BM 301 (Sooki) & Cheeky Plate CH 04.

Whew! A lot! lol

I hope you guys are having a wonderful Wednesday!
<3 Sarah!

Sunday, March 25, 2012

Black and White Stamping Mani


Happy Sunday!
This mani didn't come out perfect, haha but it's okay!
I used Milani-White on the Spot for the base & Wet n Wild-Black Creme to stamp!
     
As for the stamping, here are the plate images I used!
(R-L) From DRK-A Plate, Cheeky CH15, BundleMonster B10

:) Have a good day guys!

Tuesday, March 13, 2012

Check out my Ugly Mani Guest Post!

My friend from http://definitely-addicted.blogspot.com Does this thing called Ugly Mani Monday,
And this week's is mine! (But we both kind of forgot about it, so yes it is a day late :P)
While the colors I used are both gorgeous, the mani just did NOT turn out as I envisioned, definitely a miss here! I used Nubar- Toasted Marshmallow, and A England- Princess Sabra.

Please go to her blog to see the post HERE! Because she is awesome! :)

And if any of you have any ugly mani's email them to her at  definitelyaddicted@gmail.com with the polish you used and what you intended your manicure to look like!

Saturday, December 3, 2011

Snowflakes & Snowman!


Hey guys! Here is a winter-y holiday themed mani for you!
I started it by using 3 thin coats of Orly-Stone Cold.
(which I happened to get at Sally's for $3.99 on clearance!)
 I sponged a tiny bit of Sally Hansen diamonds and Chg Fairy dust on top all of my nails. (sorry no picture of this step)

Then using Sinful Colors-Snow me white I stamped snowflakes on my nails with BundleMonster plate BM 14 & Born Pretty Plate M59. Once dry I added a coat of Sally Hansen-Diamonds on all my nails except my accent nail, then used a coat of Seche Vite.

Then the dotting tools came in, I used Sinful Colors-Snow me white for the snowman, along with Wnw's Black, Zoya-Jancyn for the carrot nose. Opi-Offwith her red for the scarf.
Waited a LONG time for it to dry and did a topcoat of Seche vite but still managed to smear my little guy : / but hey he is still cute :)
I hope you all liked it! I like the snowflake nails so much! Diamonds looks pretty on top of them!
<3 Sarah

Monday, October 24, 2011

Black Cats & Bats! Halloween Nails!


Hey guys! I have another Halloween themed manicure for you today! I really like how it came out even though it is a bit dark and hard to see the stamping's. But I think it works, Halloween is Dark, at night haha Makes sense to me :)

I used Bundle Monster Stamping plates again, this time BM-04 & BM-213! Again using Black Konad Polish!


The Polishes I Used are...
Kleancolor-Neon Purple (base color)
$OPI-Just a Little Dangerous
Zoya-Mimi, Pinta, & Julieanne
OPI-Grape..Set..Match
China Glaze-Mummy May I
Wet n Wild-Night Prowl
Milani-Hi-Res
Konad Black

Way more than I needed to haha, I planned to do a bad ass gradient but I was out of sponges to sponge them on, I seriously cut off a piece of a brand new kitchen sponge but it didn't work as well, Love the result still!

Hope every single one of you guys are having a good day today! And if you aren't I sincerely hope it gets better!

Also I will be going out of town (Hopefully anyway!) From the 28th-Nov4th ish! We are going to Kansas to visit family for Halloween, that is if the Army ever approves my hubbies leave paperwork!
That being said if some of you are interested in doing a guest post it would help me out! I want to try to get some posts scheduled but guest posts are good too! Let me know or email it to me at Sarahmaye@gmail.com

Sunday, October 23, 2011

Spider Webs & Pumpkins

Well, Spiderwebs & Pumpkin to be exact lol :) I did a mani with stamping today! *GASP* I know it has been QUITE sometime since I have! Sorries! I just don't have a good work area so it can be a pain to, I usually just put my hand on my knee and paint or do the art that way, but with stamping I need a table and everything!

The spiderweb stamp didn't pick up and transfer completely, but I still love it. They also aren't lined up the same, but I kindof like them like this anyway! And my hubby pointed out a very good & valid point that spiderwebs are all different & not perfect anyway! So yeah :P lol

The Polishes I used are OPI-He's My Boo (2 coats as the basecoat), Then one coat of Icing-Tiger's Blood, Topped with Opi-Ya'll Come Back Ya Hear to make a Jelly Sammy :) Then Konad stamping polish in black for the webs & punkin!

I used Stamping Plates BM-222 (Pumpkin), & BM-13(Spiderwebs)
I really hope you guys like it! The brighter orange is more color accurate, but the photos kept coming out one of the other, it was more inbetween lol


Saturday, June 18, 2011

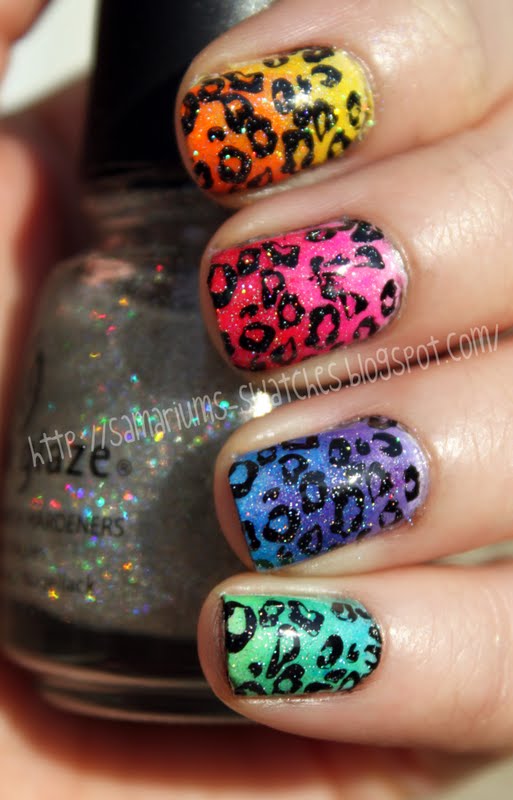
Colorful Leopard Print Sponge Mani Tutorial!

Hey fellow nail polish lovers! Today I have a tutorial for you guys!! I was asked for this by quite a few people, for the manicure I had on the other day! I hope you all like it!!! This was my first time making collages so I am sorry if it isn't perfect, I have only been doing this for like 2.5 months so I am still learning! If you have any questions/comments/concerns please feel free to ask me in the comment section below!! <3


These are all the color's I used. Ridiculous I know haha
You do not have to use nearly this amount but that is how I feel less guilty over having so many LOL

I started off with 2 coats of Sally Hansen Whirlwind White.
I hope you can read all of this >.< Sorry this was my first collages ever!


I decided to add some more spunk with Nfu oh 61,
I mean a little holo can never be a bad thing right?!


 Thanks for looking!!!     -Sarah <3