
Hey guys! It's that time of year again - piCture pOlish Blogfest!!
This year everybody will be doing nail art with the shades provided,
I can't wait to see what everyone comes up with!!
This year everybody will be doing nail art with the shades provided,
I can't wait to see what everyone comes up with!!
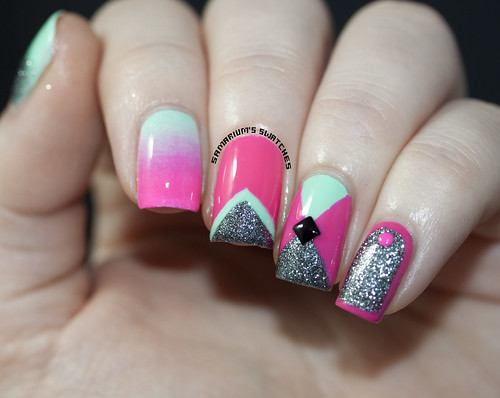
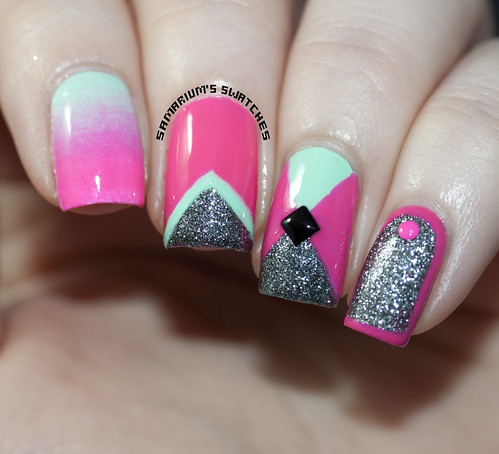
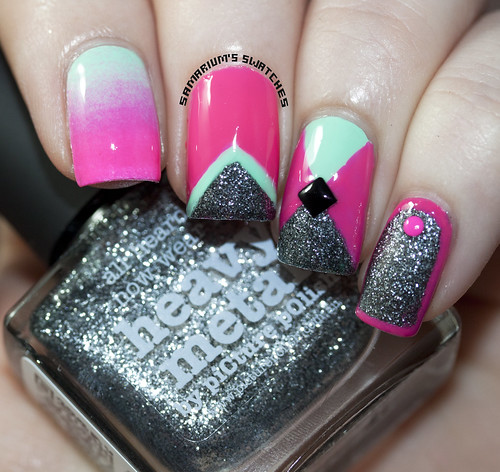
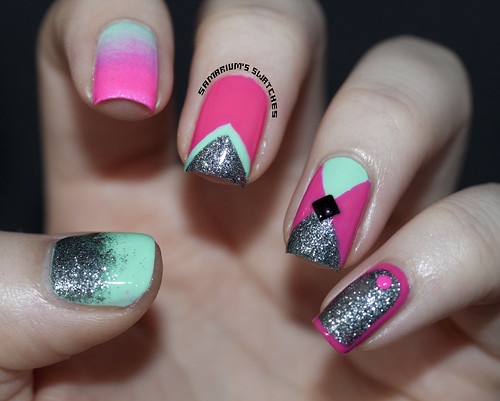
Here is the nail art look I came up with! But before I get into how I made this look,
and my very first video tutorial attempt These are the three shades I used!
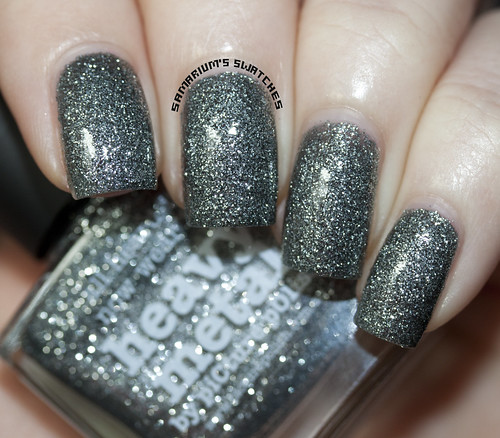
Heavy Metal - Two coats.
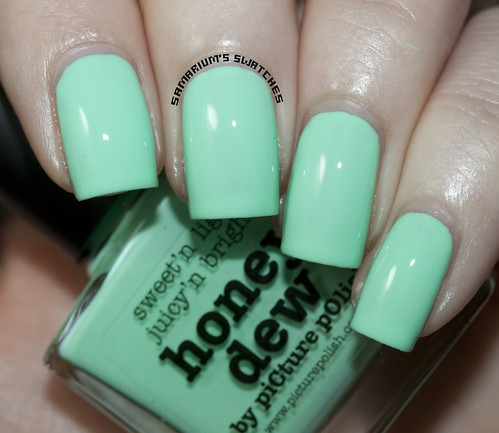
Honey Dew - Three thin coats.
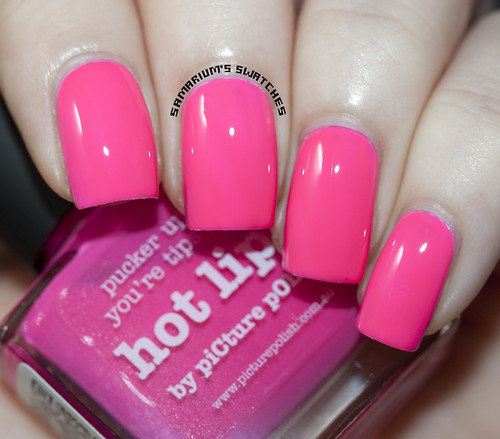
Hot Lips - Three very thin coats over White.
_______________________________________________________
Here is my tutorial, my very first one so yeah it's super far from perfect!
There is also a pictorial thing below int his post!
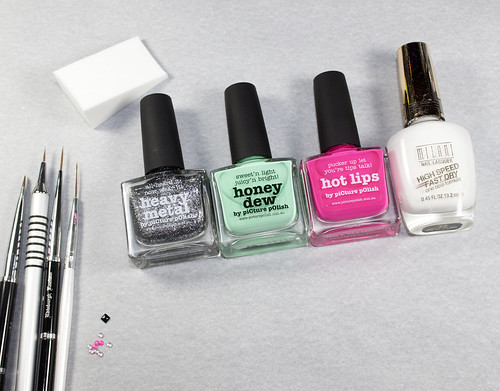
Here is everything I used!
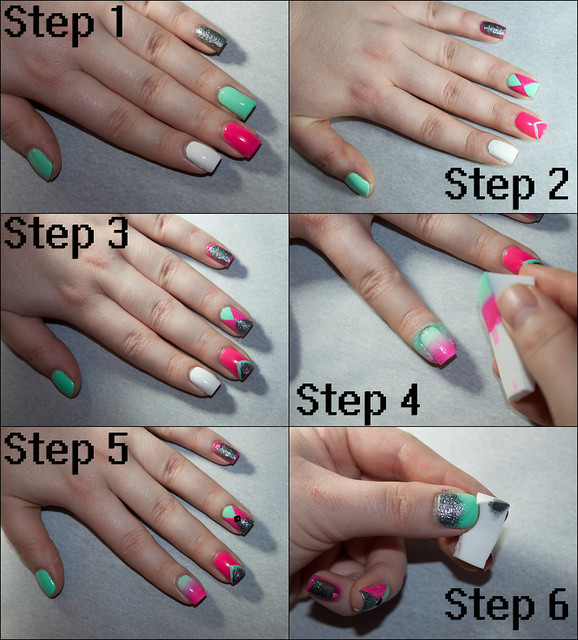

- Step 1 -
Start with nail strengthener and base coat. I used Nailtek II and Orly Bonder.
Then apply your base colors. I used Honey Dew on my ring & thumb nails.
I applied a white base to my pointer, Hot Lips on my middle nail, and Heavy Metal on my pinky nail. - Step 2 -
Frame your pinky nail using Hot Lips and a small nail art brush.
Draw a X shape on your ring nail using Hot Lips, then fill in the sides.
Draw a triangle on your middle nail using Honey Dew. - Step 3 -
Reapply Hot Lips to your "framed" pinky nail and the sides of the X on your ring nail for opacity.
Using a small nail art brush and Heavy Metal, fill in the triangle areas on your middle & ring nails. - Step 4 -
Apply Honey Dew and Hot Lips to a wedge makeup sponge and apply to your white pointer nail.
Repeat this process 3-5 times until your desired look is acquired! - Step 5 -
Using top coat and a wax pencil (or whatever you use to pick up studs and rhinestones)
pick up the studs one at a time and apply to your pinky and ring finger nails.
I used a 2mm circle neon pink stud on my pinky nail and a 2mm black square stud on my ring nail. - Step 6 -
Use a small clean portion of the same wedge sponge you used above and dab Heavy Metal
onto your thumb nail. Once dry apply topcoat to all of your nails and you are good to go!
Make sure to follow piCture pOlish!
See other Bloggers Blogfest mani's on the Pinterest board here!
You can follow piCture pOlish via Facebook, Twitter, Pinterest, YouTube & Instagram!
See other Bloggers Blogfest mani's on the Pinterest board here!
You can follow piCture pOlish via Facebook, Twitter, Pinterest, YouTube & Instagram!
To learn more about piCture pOlishes Shipping Policies, Network, and Deals check out https://www.picturepolish.com.au

*Products in this post were sent to me from piCture pOlish.*
Love it! Colours look fantastic together too :) Very striking.
ReplyDeleteP.s. I was so excited to get to use Atomic in my one. It's beautiful!!
The colours look great together! You've chosen the perfect design to show them off. Love it!
ReplyDeleteLooks stunning Sarah, you worked your colour combo perfectly!
ReplyDeleteLooks great! :)
ReplyDeleteLove this and adore your pinkie!
ReplyDeleteWow your design turned out so gorgeous! I must get my hands on Heavy Metal and Honey Dew. They are stunning!
ReplyDeleteGORGEOUS!!
ReplyDeleteabsolutely gorgeous <3 xx
ReplyDeleteFun look!! Love all the colours!! :)
ReplyDeleteLove your choice of colours! And the different patterns! (:
ReplyDeleteThe Craziest Paradigm - a 'lil bit of rust & stardust
This is so lovely!
ReplyDeletei'm TOTALLY in love <3 the colors are perfect together, you're a lucky girl you got nice ones ;) But you're also really talented.. that's the combo of a perfect mani!
ReplyDeleteThese are gorgeous!! I love how bright it is with a nice contrast of Heavy Metal.
ReplyDeleteThis is AMAAAAZING the colors are perfect together and I love the nail art you created. So gorgeous!!!
ReplyDeleteThis looks so cool and futuristic Sarah! <3
ReplyDeletei love pink and blue together and here it really stands out! love the different designs on each nail :)
ReplyDeleteAwesome colors, awesome swatches, awesome pics and for sure awesome nail art, congrats! :)
ReplyDeleteAmazing!! These colors rock!
ReplyDeleteWOW! Fantastic job!
ReplyDeleteBeautiful!!
ReplyDeletethis is a beauty!!
ReplyDeletePerfect! Just perfect!
ReplyDeleteLooks fabulous! Awesome tutorial too :)
ReplyDeleteI'm obsessed with these polishes and your manicure! You are really selling me on Hot Lips!
ReplyDeleteThis was a great use of the 3 colors together! :)
ReplyDeleteWOw. this is dedication. I Love how you used the colors. they look so good together and your result is amazing! Well done!
ReplyDeleteSO pretty :)
ReplyDeleteI love manicures like this cause Im a huge fan of aztec print and tribal print and this really give me that vibe :)
Wonderful mani :)
New subscriber :)
hugs
xx
I adore these. So up my alley. If you didn't already have a collaboration shade...
ReplyDeleteAlso Heavy Metal has looked amazing in every post I've seen it in.